The Manual
I know this is a pretty minor thing at the end of the day, but I have to say the telescope’s manual surprised me by how useful it is. It goes into enough detail about the telescope’s components, how magnification works, how to collimate, and even how to find stuff in the sky and what to expect. It’s a shame, then, that I didn’t get a copy of the manual in the box. I had to look it up online, otherwise collimation would have been tough to figure out. I will say, their guide for collimation is not all that useful in practice. It’s helpful that it shows where the relevant hardware is and how to access and manipulate it, but they depict collimation just by looking down the empty drawtube (a lot of manuals do this). Without a collimation cap, Cheshire, or laser, it’s not possible to collimate the telescope to within the proper tolerances. (Aside from the more technical star-test method)
The Optical Tube Assembly
Synta’s 5” f/5 optics are a fairly common set of optics to find in beginner telescopes, and in fact, this Optical Tube Assembly itself is found with pretty much no differences in other telescopes marketed by Celestron, Orion, and Vixen, on different mounts.
The rolled metal tube has a fully collimatable mirror cell, though it doesn’t look like it at first–there’s a metal back-plate that covers up the collimation screws (and worse, it prevents the telescope from cooling). Remove the backplate and keep it off. A more conventional set of six collimation screws was revealed behind the backplate. Three large flat phillips-head screws adjust collimation, and there are three hex-screws that serve as locking screws. A screwdriver is included, but it’s very concerning that no hex key is included, so you’re on your own if you want to collimate the primary or secondary mirror. You need a 2mm Allen key for the secondary mirror and a 2.5mm key for the primary locks. Collimation isn’t too hard with the drawtube racked all the way in, using a Cheshire collimating eyepiece or a Collimation Cap, but the focuser wobble will undo your hard work once you’re done.
The front of the OTA has a standard finder shoe that holds the red dot finder, and the plastic 1.25” rack & pinion focuser. Orion sells this focuser separately for amateur telescope maker supplies, so is it any good? No. It’s probably the single biggest fault of the telescope. Any amount of pressure or weight on the drawtube when extended will cause it to sag down, and that makes it impossible to collimate the telescope, since the weight of the eyepiece will cause the focuser to sag in a different direction, as the telescope is moved up and down. This can be fixed by getting some thin strips of Teflon and applying them to the inside of the focuser so that the drawtube moves freely, and with no wobble. A fix is described in this thread by SkyMuse on Cloudy Nights.
The secondary mirror is held up by a four-vane spider and is collimatable.
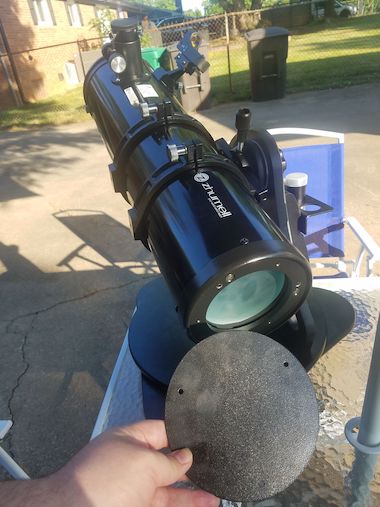
The telescope comes with a two-piece dust cap on the front. The entire cap is meant to be removed, however, a small port can be opened up instead to stop the telescope down to about 40mm aperture, with almost no obstruction. This is of limited utility but might sharpen images of the Moon at low and medium powers when the seeing is bad, and it will reduce the full Moon’s brightness.

The telescope doesn’t control stray light especially well. Light can actually get in through the back if you remove that back-plate (you should still remove it), but that is almost never an issue. At night, you’re not going to see stray light from the back. The inside of the tube is more of a dark gray than a real black. Some would go to the trouble of flocking the inside of the focuser drawtube and optical tube, and blackening everything that isn’t an optical surface with flat black paint. But from what I can tell, the only things that need to be darker are the region around the mirror cell (only if the light gets in through the back), and the rough edge around the secondary mirror. In practice? The difference is hard to notice. If you’re the tinkerer type, look into deadening or flocking a Newtonian telescope, you might get some improvement.
Optical Quality
The Z130 is a Newtonian reflector with a 130mm (5.1″) aperture and a focal length of 650mm, for a focal ratio of f/5. It can be difficult to figure short-tube Newtonian mirrors to a proper figure which deviates from a paraboloid by 1/1000th the width of a saran wrap; and some brands (including some telescopes also made by Synta) don’t bother, instead shipping a fast spherical mirror which can never focus light properly (i.e., a complete rip-off). I am very pleased to see this isn’t the case here: the Z130 has a real parabolic mirror, and it’s not bad.
The star-images betray a bit of spherical aberration, but it’s easily within the “diffraction-limited” qualification, which represents a surface that deviates from a perfect parabola by around a quarter of a wavelength of light. This qualification, though a bare minimum of acceptability, is often not met by budget telescopes. Coma due to mis-collimation was a more important effect, and unfortunately, without modifying the focuser, I wasn’t able to really get rid of it.
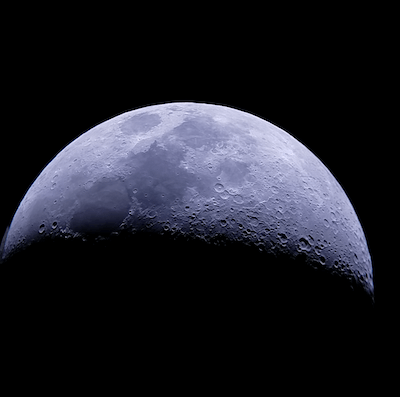
In practice, star-images don’t matter as much as what you see through the telescope, and I can guarantee that the images of the Moon you will see through the Z130 go right up to the seeing limit on a typical night. The rule of thumb for maximum useful magnification (beyond which you should expect even good telescopes to get fuzzy) in a 130mm telescope is 260x, and it was showing great images at 162x and passable images at 270x.
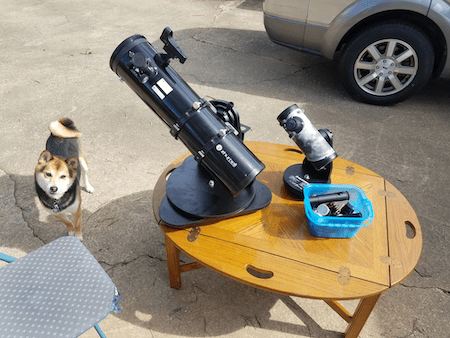
The Tabletop Rocker-Mount
The Z130 is a tabletop Dobsonian, which means it’s on a simple, sturdy, easy-to-use lazy-susan and rocker-arm that goes up, down, and all around, and you put it on a table to get it at a comfortable height.
The mount (made of cheap laminated particleboard) is excellent. I mean, it’s just about perfect for a manual telescope mount. It’s got a large piece of Teflon in its altitude bearing, which makes it smooth to operate and with just the right amount of stiction. Tracking at high powers is easy, and there’s very little vibration.
As it is a manual mount, you will have to aim it yourself. The best way to do this, for objects you can’t see with the unaided eye, is a “star hop” where you follow constellations, asterisms, and stars to find roughly where the object is, then narrow it down in the eyepiece. This is easy and fun when you get the hang of it, and the sturdiness of the mount really comes in handy–you wouldn’t be able to star hop nearly as effectively in the cheap EQ mounts that come with many beginner telescopes.
Compared to other Tabletop Dobs, the mount is extremely sturdy. Not long ago, I saw some unfortunate shipping damage done to another table-dob, where a crack formed in the particle-board along the altitude bearing. I can’t imagine that anything like that could happen to the Z130’s bulky base. It’s overbuilt, and that may or may not be a good thing. It means it’s a lot heavier than the other 5” Tabletop Dobsonians, but it does mean it’s a bit sturdier. There are two large handles cut into the base. Hold one or the other, and your other hand holds the bottom-boards of the mount. An eyepiece tray can be installed on the rocker-arm for three eyepieces. I usually end up putting the eyepieces on the table or on the bottom board of the base, but the tray comes in handy for storage. If you cap the eyepieces while they’re in the tray, they won’t go anywhere.
The telescope is mounted in tube rings, which is a nice step up over most tabletop dobsonians, as it means you can adjust the angle of the eyepiece depending upon the position you’re observing from. This versatility is missing in a lot of table-dobs and has absolutely come in handy for me. The tube rings are attached to a standard Vixen Dovetail, which means they can be used on any vixen compatible mount, so an Equatorial Mount could be used instead, or a tripod-mounted alt-az mount like a Vixen Porta or Explore Twilight. These mounts would be more expensive than the telescope itself, however.
What do you put it on?
One of the biggest problems with these tabledob mounts is the question of what to put them on. The cardboard box it came in could work in a pinch, but I find it’s just too wobbly and only suitable for low power.
Whatever you put on, you need to be able to walk all the way around it, and you ideally want to be able to sit down anywhere around it. When using it on a regular-height table, the eyepiece is usually too high to look through. When standing, it’s the right height to use, though you’ll have to rotate the tube so the eyepiece is at a comfortable angle. A TV-tray, which would work for smaller tabledobs, is too small to accommodate the broad feet of the Z130.
When sitting down, the correct height for the surface you place the Z130 on is almost exactly the same height as your seat, or maybe a little higher. In a pinch, I was able to (just barely) get it stable on a metal folding chair. But then you’re limited to half the sky. A flat, three-legged stool would work well. I have a short table that is the correct height, but it’s a nice piece of furniture that can’t be kept outside. So, unfortunately, that brings us to a problem with these scopes.
These telescopes are marketed as portable or “Grab-N-Go” telescopes, but that’s often not the case. In order for it to be portable, you need a bulky, sturdy table to come with you, and it’s going to have to be collapsible. For a Grab-N-Go telescope, the table needs to already be outside and in the right location for viewing. (For some reason, people like to put their tables under the shade of trees, instead of out under the open sky.)
The best solution I’ve heard of, and it’s one I haven’t yet had the opportunity to try, is to get a big, sturdy storage tub. Turn it upside down and it becomes a sturdy base, and then when you’re done, turn it right side up and it becomes storage for the telescope. That’s definitely something to try.
Some observers ditch these mounts to convert their tabledobs to grab-n-go. At one point, Vixen sold this telescope tube on their Vixen Porta mount, and that solution worked fine, and it had better, given the price tag.
The question of where you put the telescope is absolutely solvable, but it is one that should not be glossed over when considering one of these scopes. The stool- or tub-based solutions are probably best.
Z130 Accessories
The Z130 comes with a finder, two eyepieces, a screwdriver, and the aforementioned eyepiece tray.
The Red Dot Finder is a good choice for an affordable telescope. At this price range, the alternative is a McDonald’s toy-style optical finderscope, so the red dot finder is much appreciated. It projects a red dot at an apparently infinite distance against the stars (that is, there’s no parallax as you move your head) so that when it is aligned, it shows you where your telescope is pointed. At a wide field of view (say, with a 32mm Plossl), the telescope can work (just barely) as its own finder-scope, showing you a rich field full of the asterisms you need to star-hop to a target.

The included eyepieces are 25mm and 10mm Kellners, yielding 26x and 65x. They’re cheap, but they’re just about adequate. They have a fairly narrow field of view, but they’re not too soft at the edges, and the eye relief (distance between eyeball and glass) is comfortable for the 25 and acceptable for the 10.
These magnifications are pretty low powers, but the 10mm is enough to show Saturn’s rings and lots of detail on the Moon. They’re enough to get you started right out of the box, but you’re going to want to upgrade them pretty soon.
Suggested Aftermarket Accessories
To fully take advantage of the widest field of view, get a 32mm Plossl. Images will be slightly brighter too, though most deep-sky objects will be really small at this power. It’s good for a few, especially large objects like the Andromeda Galaxy and the Pleiades, or for fitting in star clouds and OB-associations. It’s mostly useful as a 20x finder-eyepiece.
You could then replace your 25mm and 10mm eyepieces. A 25mm or 20mm Plossl, a 20mm or 15mm Goldline, would be a good cheap replacement. The 10mm can be replaced with a 9mm Goldline. A 10mm Plossl would have a slightly wider field of view than the Kellner, but it would have shorter eye relief, so it’d be less comfortable to use.
About the only good, cheap High Power eyepiece is a 6mm Goldline. But even that isn’t really enough to reach maximum power, and in short-focus telescopes it ends up with a pretty soft image since its design can’t handle the broad light cone of an f/5 telescope. To reach high powers, consider a fully-multicoated achromatic (2-element) or apochromatic (3-element or more) Barlow lens of 2x or 3x magnification. Choose magnifications of around 130x and between 200x and 260x for high powers. Remember that you will rarely exceed 200x. Another, slightly more expensive option could be a 58-Degree Planetary Eyepiece. They do come in 6mm focal lengths, but you can also get ones in between 2.5mm and 4.5mm focal lengths for more suitably high powers without using a Barlow. 58-degree Planetaries are more expensive than a Goldline, but they’re tack-sharp right up to the edge of the field of view and don’t require a separate Barlow lens.
Magnification = Focal Length of Telescope / Focal Length of Eyepiece
(Barlows multiply the focal length of the telescope)
There are other, more expensive options with wider, sharper fields of view and better internal blackening if you want it. But conventional Plossls and the affordable Goldlines/Redlines/Expanse (66-degree Ultra-Wide-Angle) work fine. Dual ED eyepieces such as the AT Paradigm and Agena StarGuider series are also a good fit on a reasonable budget. The irony is that short, fast telescopes (like tabletop dobs) work best with expensive eyepieces, which can deal with their broad light cone.
The book “Turn Left At Orion” is a must-have accessory for any beginner astronomer, as it shows how to find and observe the Moon and Planets as well as hundreds of Deep-Sky-Objects. The view simulations in the book represent a small refractor and a large Dobsonian. This scope is somewhere in between.
What can you see with the Zhumell Z130?
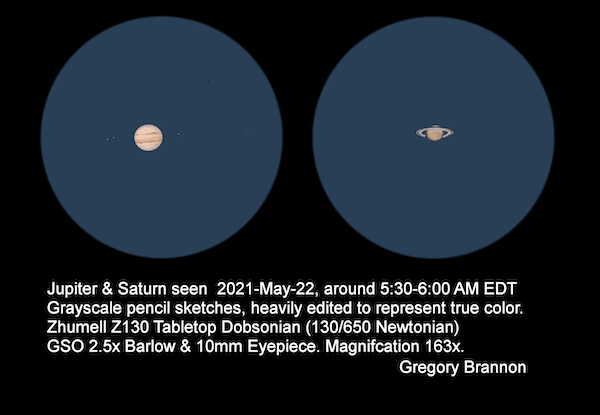
As mentioned, the Moon is beautiful in this telescope, even at high power. Planets are accessible too, but the telescope should be at peak collimation to reveal much detail in them. Jupiter’s cloud bands and Saturn’s rings are easy, even for much smaller scopes, and at the included 65x, they’re plainly visible.
Lots of double stars can be found and split, and the optics are good enough that even pretty close doubles can be resolved—there’s not much bleeding of light from one to the other unless the air is turbulent.
Every Messier object is within reach, even from the light-polluted suburbs. You will have to use the scope for a while and train your eye and your brain to observe faint objects–observing experience is worth magnitudes. Keeping a sketchbook or log of the objects you see at the eyepiece will train your brain to see finer details.
Many open clusters are gorgeous at low and medium powers. Cassiopeia and Perseus have open clusters worth looking around for, such as the ET Cluster and the Double Cluster. Scanning the band of the Milky Way at low power can be quite rewarding.
Most Deep-Sky-Objects look like faint smudges, but it’s remarkable how much detail even a little scope like this can pull out of them.
Here are four sketches of deep-sky objects as seen with the Z130 from bright suburbs.
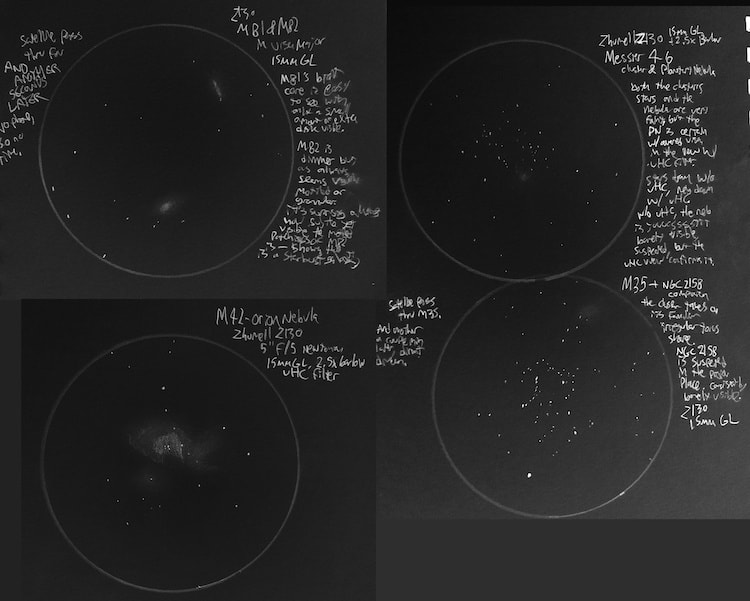
Galaxies Messier 81 & Messier 82, Open Cluster M46 & Planetary Nebula NGC2438, the Great Nebula in Orion M42, and a showpiece open cluster Messier 35 & its dim little background companion NGC2158.
Of course, I can’t list every object worth looking at through this telescope; there are too many. Many objects are a little dim compared to what I’m used to, so you should be aware that though there’s a lot to see, a larger aperture would show it to you brighter, easier, and with more detail. You may want to upgrade to a larger aperture at some point. But this should keep you going for a few years until then, and even then, I suspect you’ll manage to find a use for it as a Grab-N-Go telescope to supplement a bigger telescope.